Deploy Application
Currently, Modern.js offers two deployment way:
- You can host your application in a container that includes a Node.js environment on your own, which provides flexibility for the deployment of the application.
- You can also deploy your application through a platform. Currently, Modern.js officially supports deployment on Netlify, Vercel, and Github pages.
Currently, Modern.js only supports running in a Node.js environment. Support for more runtime environments will be provided in the future.
Build Deployment Products
Running the modern deploy command will automatically produce deployment products. This process includes optimizing Bundler build products and their dependencies, detecting the current deployment platform, and automatically generating deployment products that can run on that platform.
If you want to generate and test the output locally for a specific deployment platform, you can specify the platform by setting the environment variable: modern deploy:
MODERNJS_DEPLOY=netlify npx modern deployWhen deploying on the deployment platforms officially supported by Modern.js, there is no need to specify environment variables.
Using ModernJS built-in Node.js Server
Single Repo
By default, Modern.js outputs builds that can be run in a Node.js environment when no Modern.js-supported deployment platform is detected.
Use the following command to build the project:
npx modern deployWhen running the modern deploy command, Modern.js will generate runnable products and output the following content in terminal:
Static directory: `.output/static`
You can preview this build by `node .output/index`
At this point, you can run the entire server by node .output/index, and the static resources required for the page are in the .output/static directory. You can upload these static resources to a CDN yourself:
By default, when running Modern.js Server, it listens on port 8080. If you want to change the listening port, you can specify the PORT environment variable:
PORT=3000 node .output/indexMonorepo
For Monorepo projects, in addition to building the current project, it is also necessary to build other sub-projects in the repository that the current project depends on.
Assume that the name in the package.json of the current project is app. Taking pnpm as an example of a monorepo management tool, you can add the following command to the package.json of the current project to build products for the current project:
{
  "scripts": {
    "build:packages": "pnpm --filter 'app^...' run build",
    "deploy": "pnpm run build:packages && modern deploy"
  }
}
If you use Rush as your Monorepo management tool, you can add the following commands to your package.json:
{
  "scripts": {
    "build:packages": "rush rebuild --to-except app",
    "deploy": "rushx build:packages && modern deploy"
  }
}
After the build is completed, Modern.js will generate all dependencies in the .output/node_modules directory of the project. Similarly, you can run the Modern.js server using node .output/index.
Netlify
Netlify is a popular Web development platform designed for building, deploying, and maintaining modern web projects. Deploying on Netlify mainly requires configuring the netlify.toml file.
Depending on the complexity of your project, you can configure it incrementally by this doc.
Pure Front-end Project
Add the netlify.toml file to the root directory of the current project:
.
├── src
├── modern.config.ts
├── netlify.toml
└── package.json
Add the following content to netlify.toml:
[build]
  publish = "dist"
command = "modern deploy"You can refer to the deployment project example.
Now, add a project to the Netlify platform and deploy it!
Full Stack Project
Full-stack projects refer to projects that use Custom Web Server, SSR or BFF. These projects need to be deployed on Netlify Functions. Based on the netlify.toml file mentioned above, add the following configuration:
[build]
  publish = "dist"
  command = "modern deploy"

[functions]
  directory = ".netlify/functions"
  node_bundler = "none"
  included_files = [".netlify/functions/**"]
- Currently, Modern.js does not support deployment on Netlify Edge Functions. We will support it in future versions.
- You can refer to the deployment project example.
Monorepo
The following guide is mainly for full-stack projects, for pure CSR projects, just follow Pure Frontend Project to deploy.
For Monorepo projects, in addition to building our current project, you also need to build other sub-projects in the repository that the current project depends on.
We take a pnpm Monorepo repository as an example and deploy the Monorepo project on Netlify.
Assuming the directory structure of the Monorepo repository is as follows:
.
├── packages
│ ├── app
│ └── app-dep1
├── package.json
├── pnpm-lock.yaml
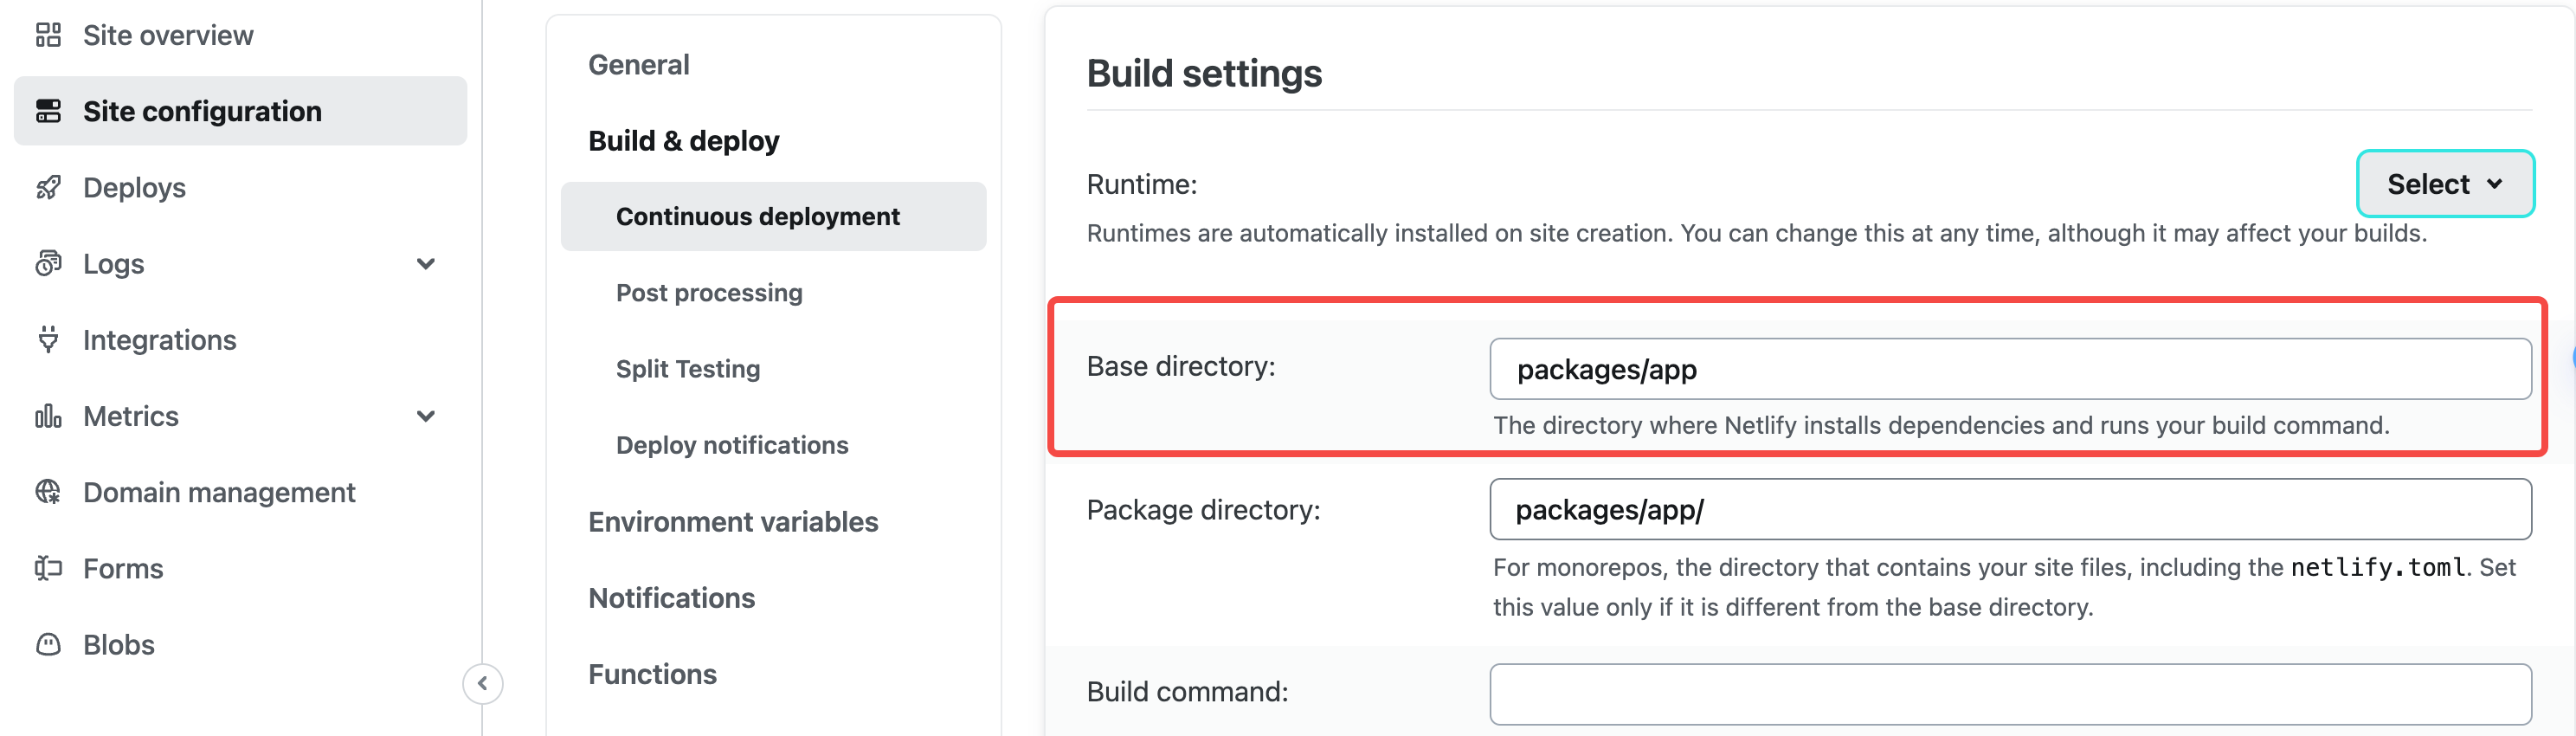
└── pnpm-workspace.yamlYou need to configure Base directory on the netlify platform as packages/app:
Add the following script in packages/app/package.json, before executing the deployment command of the app repository, first execute the build of other repositories in the workspace:
{
  "scripts": {
    "build:packages": "pnpm --filter 'app^...' run build",
    "deploy": "pnpm run build:packages && modern deploy"
  }
}
Configure the build command in netlify.toml:
[build]
  publish = "dist"
  command = "npm run deploy"

[functions]
  directory = ".netlify/functions"
  node_bundler = "none"
  included_files = [".netlify/functions/**"]
Just submit your code and deploy it using the Netlify platform.
Vercel
Vercel is a deployment platform for modern web applications that provides a rich set of features to support deploying static websites, server-side rendered applications, and more. To deploy on Vercel, you usually need to configure the vercel.json file, which you can configure incrementally depending on the complexity of your project.
Pure Front-end Project
Add the vercel.json file to the root directory of the current project:
./
├── src
├── modern.config.ts
├── vercel.json
└── package.json
Add the following content to vercel.json:
{
"buildCommand": "modern deploy",
"outputDirectory": ".vercel/output"
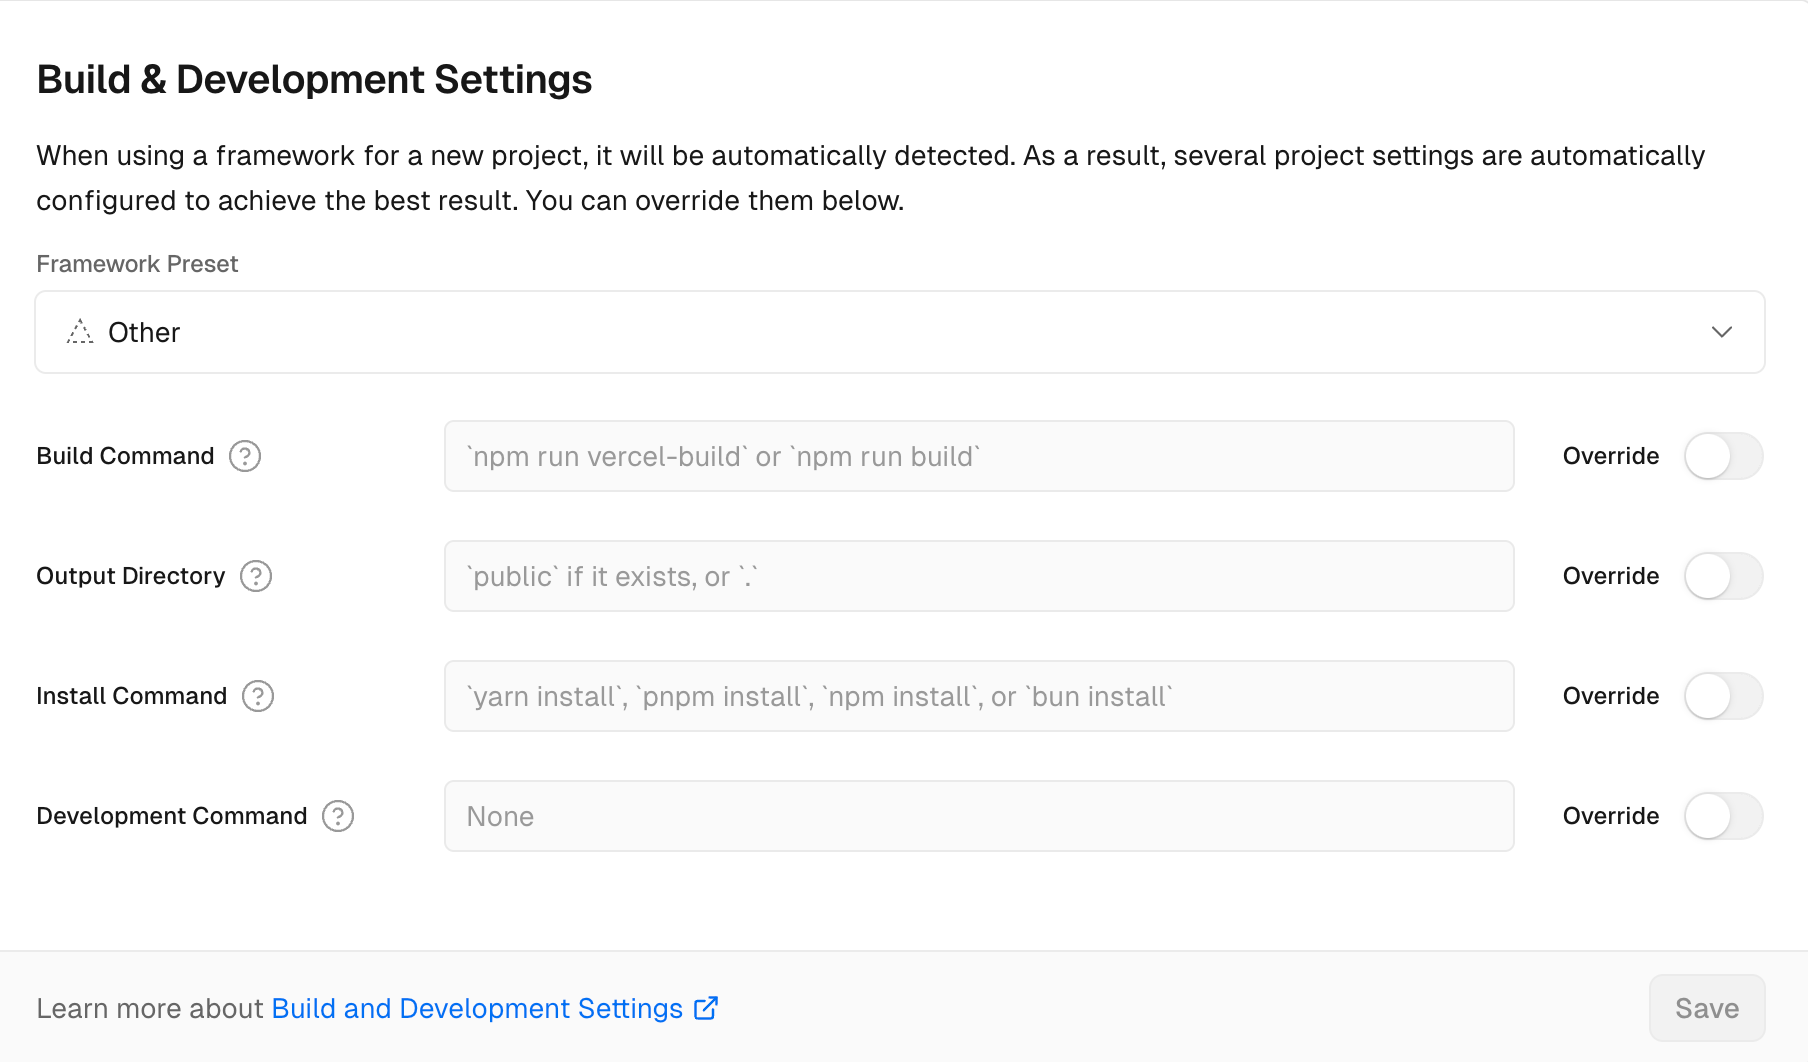
}Commit your project to git, select Framework Preset as Other on the Vercel platform and deploy.
You can refer to the deployment project examples.
Full Stack Project
Full-stack projects refer to projects that use Custom Web Server, SSR or BFF. These projects need to be deployed on Vercel Functions.
In addition to configuring vercel.json in the same way as a pure front-end project, there are two points to note for full-stack projects:
- Currently, Modern.js does not support deploying BFF projects on the Vercel platform. We will support it in future versions.
- The Node.js version for function execution is determined by the project configuration on the Vercel platform.
You can refer to the deployment project examples.
Monorepo
The following guide is mainly for full-stack projects, for pure CSR projects, just follow Pure Frontend Project to deploy.
For Monorepo projects, in addition to building our current project, you also need to build other sub-projects in the repository that the current project depends on.
We take a pnpm Monorepo repository as an example and deploy the Monorepo project on Vercel.
Assuming the directory structure of the Monorepo repository is as follows:
.
├── packages
│ ├── app
│ └── app-dep1
├── package.json
├── pnpm-lock.yaml
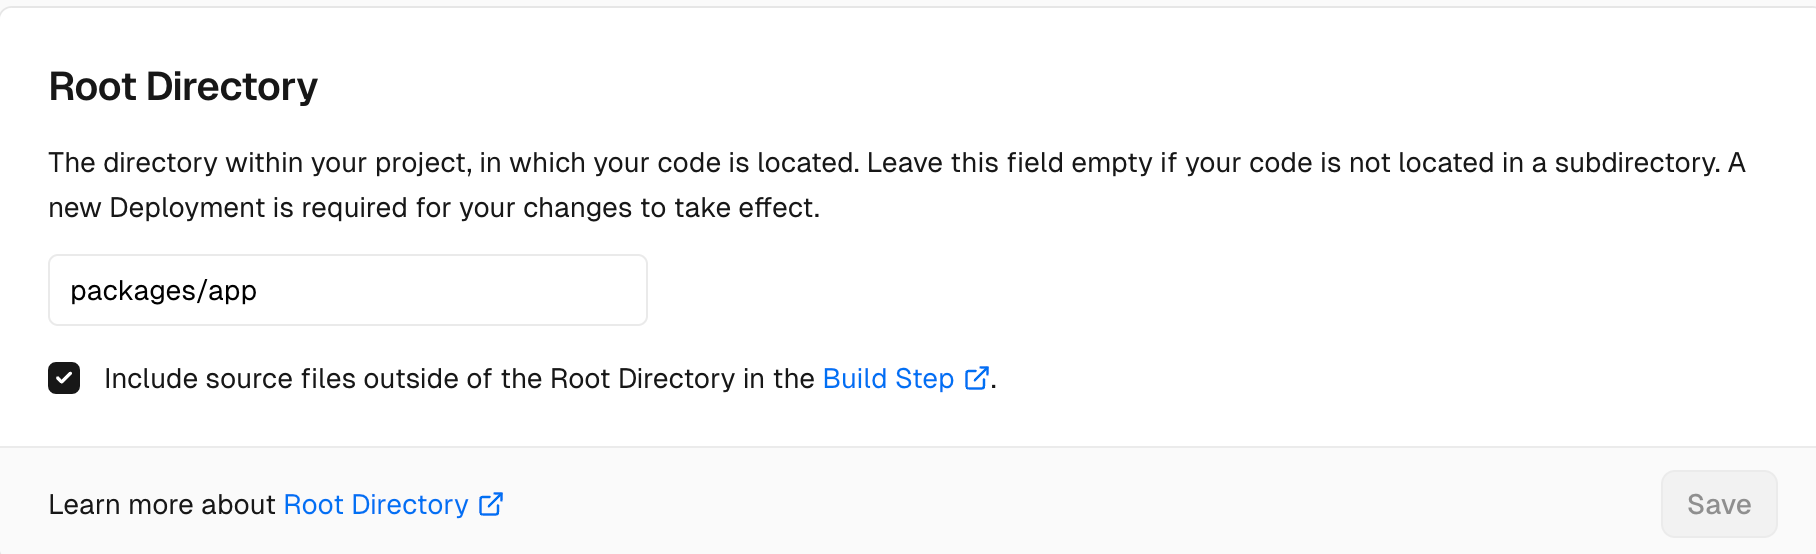
└── pnpm-workspace.yamlFirst, you need to configure the Root Directory as packages/app on the Vercel platform:
Specify Node.js runtime as 20.x:
"engines": {
  "node": "20.x"
}
Add the following script to packages/app/package.json to run build command of the other repositories in the workspace before run the deploy command for the app repository:
{
  "scripts": {
    "build:packages": "pnpm --filter 'app^...' run build",
    "deploy": "pnpm run build:packages && modern deploy"
  }
}
Add the following content to the packages/app/vercel.json file:
{
  "buildCommand": "npm run deploy",
  "outputDirectory": ".vercel/output"
}
Just submit your code and deploy it using the Vercel platform.
Github Pages
If you're creating a GitHub Pages for a repository without a custom domain, the page URL will follow this format: http://<username>.github.io/<repository-name>. Therefore, you need to add the following configuration in modern.config.ts:
import { defineConfig } from '@modern-js/app-tools';

export default defineConfig({
  //...
  server: {
    baseUrl: '/<repository-name>',
  },
  output: {
    assetPrefix: '/<repository-name>',
  },
});
GitHub Pages supports two deployment ways: branch deployment or GitHub Actions deployment.
For branch deployment, follow these steps:
- In the GitHub repository, navigate to Settings > Pages > Source > Deploy from a branch
- Install the
gh-pagesas devDependency - Add the following script to
package.json
"scripts": {
  //...
  "deploy:gh-pages": "MODERNJS_DEPLOY=ghPages modern deploy && gh-pages -d .output"
}- Run
npm run deploy:gh-pages
- Running
MODERNJS_DEPLOY=ghPages modern deploywill build the production output for GitHub in the .output directory. - You can refer to the project :::
For GitHub Actions deployment, select Settings > Pages > Source > GitHub Actions, and add a workflow file to the project. You can refer to the example.
Using Self-Built Node.js Server
Typically, we recommend using the built-in Node.js server of Modern.js to deploy applications. It supports hosting both pure frontend and full-stack projects, ensuring consistent performance in both development and production environments.
If your project is purely frontend, you can also deploy the application to the self-built Node.js server. Below is an example of using a Koa server to host the output of a pure frontend project.
For instance, if you have a Node.js server repository, you can copy the output of the project into this repository. The structure would look like this:
.
├── .output
│   ├── html
│   └── static
└── server.js
In server.js, assume you have the following code:
import Koa from 'koa';

const app = new Koa();
app.use(async (ctx, next) => {
  ctx.body = 'Hello Modern.js';
});
app.listen(3000);
Now, you can add some code to include the logic for accessing static resources and HTML files in server.js. We need to use the mime-types package to get the MIME types of static resources, so let's install the dependency first:
npm add mime-typesconst Koa = require('koa');
const fs = require('fs');
const path = require('path');
const mime = require('mime-types');
const app = new Koa();
app.use(async (ctx, next) => {
if (ctx.path.startsWith('/static')) {
ctx.type = mime.lookup(ctx.path);
ctx.body = fs.createReadStream(
path.resolve(__dirname, `.output${ctx.path}`),
);
} else if (ctx.path === '/') {
ctx.type = 'html';
ctx.body = fs.createReadStream(
path.resolve(__dirname, '.output/html/main/index.html'),
);
}
});
app.listen(3000);:::note The above code is a basic example. Your application might have multiple entry points and require different HTML files for different paths. A custom Node.js server would also involve more complex logic.
Please note that if your project uses Modern.js conventional routing or if you have set up client-side routing with React Router, you must access HTML files through the correct baseURL.
In Modern.js, the default baseURL is '/'. You can configure it by modifying server.baseUrl in modern.config.ts.
:::danger
For projects with client-side routing, you can never access HTML files through the /index.html path.
Nginx
Nginx is a high-performance HTTP and reverse proxy server that can handle static files, reverse proxy, load balancing, and other functions. Deploying on Nginx typically requires configuring the nginx.conf file.
If your project is a purely front-end project, you can also deploy the application through Nginx. Here is an example of an Nginx configuration to demonstrate how to host the output of a purely front-end project.
# user [user] [group];
worker_processes 1;

events {
    worker_connections 1024;
}

http {
    include       mime.types;
    default_type  application/octet-stream;

    server {
        listen 8080;
        server_name localhost;

        location / {
            # root [projectPath]/.output/html/main;
            index index.html;
            try_files $uri $uri/ =404;
        }

        location /static {
          # alias [projectPath]/.output/static;
        }
    }
}
In the above configuration, you need to replace [projectPath] with your project path and [user] and [group] with your current user and user group.
You can copy the above configuration into the nginx.conf file in the Nginx installation directory and then start the Nginx service. You can also start the configuration file in a specified path using nginx -c, in which case you need to ensure that the path configured in the include directive is correct.